


Now we come to one of the main reasons I started the blog, so I can share my original patterns.
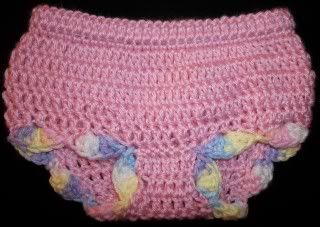
Tina's cute and easy diaper cover (size 0-3 months)
Materials
2-3 ounces Caron Simply Soft or other light worsted weight yarn
Size H hook (G if you crochet loosely)
This is for a diaper cover for 0-3 months in size
Yarn needle
3/8" elastic about 15-16 inches
Small amount of thread and sewing needle
Special Stitches
DCdec: YO insert hook in first stitch YO pull loop through insert hook in second stitch YO pull loop through, YO pull through first three
loops on hook, YO pull through remaining two loops on hook
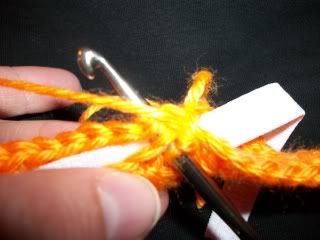
ch. 72 (for more elasticity/stretch you can use a chainless foundation instead)
Waistband
Join to make loop (make sure you don't twist the chain before joining)
Round 1) Ch 3 DC in each across, join last stitch to top of 1st DC with slip stitch, Ch. 3
DO NOT TURN
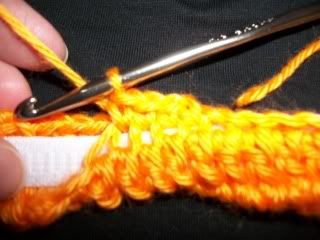
Round 2) DC in next st and in each around. Join. (put work down for next step)
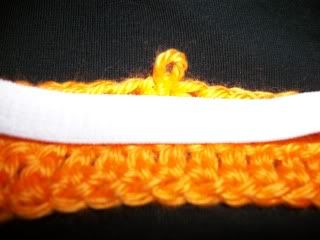
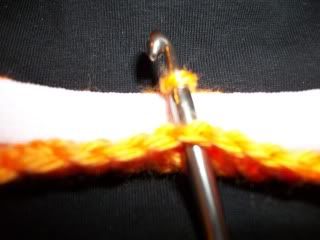
Make a loop out of the elastic overlapping the edges by at least 1/2 inch. Stitch together securely.
Round 3) Drop the loop from your hook, hold part of the elastic round against your first DC row. Fold the bottom DC row
around the elastic. Insert your hook through the loop that should be folded in front of your joining loop from the previous
round, pick up the loop and pull it through, now SC through both layers matching the loops around. Make sure you are folding
the work around the elastic as you go. Join to first SC.
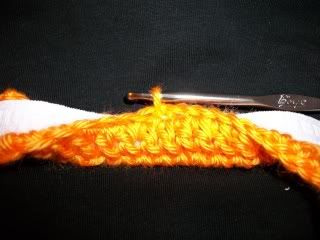
Round 4) Ch 3, DC in same st, *DC in next five, 2 DC in next* around, join.
Round 5-6) Ch 3, DC in each st around
Round 7-8) Ch 3, *DCdec over next two, DC in next five* around, join
Shaping the leg holes
Row 9) Ch 3, DC in each of next 23 st
Row 10) CH 3, turn, DCdec over next two, DC in each stitch across until last three stitches DCdec over the second and third
st from the end, DC in last St
Row 11) (start out counting stitched from previous row) CH 3, turn, DCdec over next two, DC across to the middle of row,
DCdec over two middle stitches, DC in each stitch across until last three stitches DCdec over the second and third
st from the end, DC in last St
Row 12-13) Ch 3, turn, *DCdec over next two, DC in next two DC* across until last three stitches DCdec over the second and third
st from the end, DC in last St
Row 14-16) Ch 3, turn, DC in each across
Row 17) Ch 3, DC in same stitch, DC across, two DC in last
Joining to finish leg holes
Turn work inside out, drop loop from hook. You are now going to match the row you just finished to the bottom of your last
round, you want to count the stitches from one leg opening to the other and match row 17 to the center stitches. You are going
to do what you did for the waistband and pull the dropped loop through but slip stitch through both layers to the end of the row. Fasten off.
Leg ruffles.
Join yarn at the back leg hole corner
Ch 3, DC 4 times in same st, *sk 2 st, sl st in next, sk 2 st, DC 5 times in same st* around join last sl st to first ch 3. Fasten off.
Repeat for other leg hole
Weave all loose ends in using the yarn needle.

Materials
2-3 ounces Caron Simply Soft or other light worsted weight yarn
Size H hook (G if you crochet loosely)
This is for a diaper cover for 0-3 months in size
Yarn needle
3/8" elastic about 15-16 inches
Small amount of thread and sewing needle
Special Stitches
DCdec: YO insert hook in first stitch YO pull loop through insert hook in second stitch YO pull loop through, YO pull through first three
loops on hook, YO pull through remaining two loops on hook
ch. 72 (for more elasticity/stretch you can use a chainless foundation instead)
Waistband
Join to make loop (make sure you don't twist the chain before joining)
Round 1) Ch 3 DC in each across, join last stitch to top of 1st DC with slip stitch, Ch. 3
DO NOT TURN
Round 2) DC in next st and in each around. Join. (put work down for next step)
Make a loop out of the elastic overlapping the edges by at least 1/2 inch. Stitch together securely.
Round 3) Drop the loop from your hook, hold part of the elastic round against your first DC row. Fold the bottom DC row
around the elastic. Insert your hook through the loop that should be folded in front of your joining loop from the previous
round, pick up the loop and pull it through, now SC through both layers matching the loops around. Make sure you are folding
the work around the elastic as you go. Join to first SC.


Round 4) Ch 3, DC in same st, *DC in next five, 2 DC in next* around, join.
Round 5-6) Ch 3, DC in each st around
Round 7-8) Ch 3, *DCdec over next two, DC in next five* around, join
Shaping the leg holes
Row 9) Ch 3, DC in each of next 23 st
Row 10) CH 3, turn, DCdec over next two, DC in each stitch across until last three stitches DCdec over the second and third
st from the end, DC in last St
Row 11) (start out counting stitched from previous row) CH 3, turn, DCdec over next two, DC across to the middle of row,
DCdec over two middle stitches, DC in each stitch across until last three stitches DCdec over the second and third
st from the end, DC in last St
Row 12-13) Ch 3, turn, *DCdec over next two, DC in next two DC* across until last three stitches DCdec over the second and third
st from the end, DC in last St
Row 14-16) Ch 3, turn, DC in each across
Row 17) Ch 3, DC in same stitch, DC across, two DC in last
Joining to finish leg holes
Turn work inside out, drop loop from hook. You are now going to match the row you just finished to the bottom of your last
round, you want to count the stitches from one leg opening to the other and match row 17 to the center stitches. You are going
to do what you did for the waistband and pull the dropped loop through but slip stitch through both layers to the end of the row. Fasten off.
Leg ruffles.
Join yarn at the back leg hole corner
Ch 3, DC 4 times in same st, *sk 2 st, sl st in next, sk 2 st, DC 5 times in same st* around join last sl st to first ch 3. Fasten off.
Repeat for other leg hole
Weave all loose ends in using the yarn needle.
This has been tested by a few people with no problems but if you find it confusing please let me know so I can clarify.
NOTE: This pattern is very forgiving on the rounds so if your counts are slightly off during increases or decreases you probably don't need to rip a row out and start it over. Unless they are way off repeatedly it won't be noticed on the finished piece. After you have worked the pattern through once or twice adjusting for size is as simple as adding 5-10 chains on the foundation chain and working an extra round during rounds 5-6
NOTE: This pattern is very forgiving on the rounds so if your counts are slightly off during increases or decreases you probably don't need to rip a row out and start it over. Unless they are way off repeatedly it won't be noticed on the finished piece. After you have worked the pattern through once or twice adjusting for size is as simple as adding 5-10 chains on the foundation chain and working an extra round during rounds 5-6